Vue 3, with its composition API , brought a new and better way to handle the component lifecycle. Understanding the Vue 3 lifecycle is essential for every developer who wants to get the most out of this frontend framework. Let’s see how the Vue 3 lifecycle works using the Composition API, exploring the main steps and components involved.
Lifecycle Overview in Vue 3
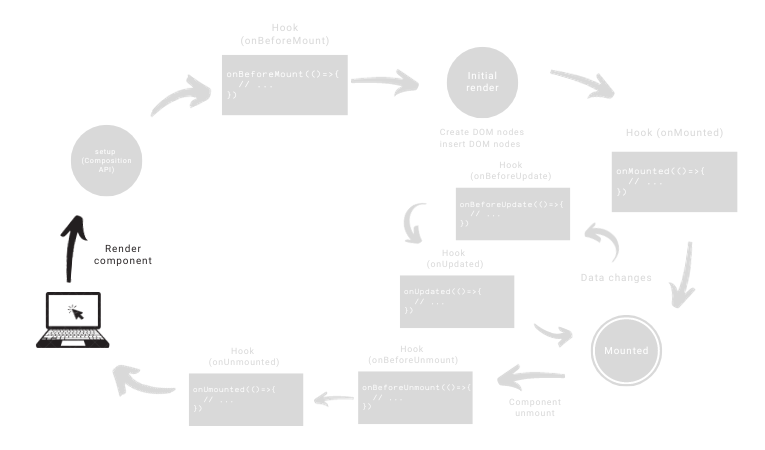
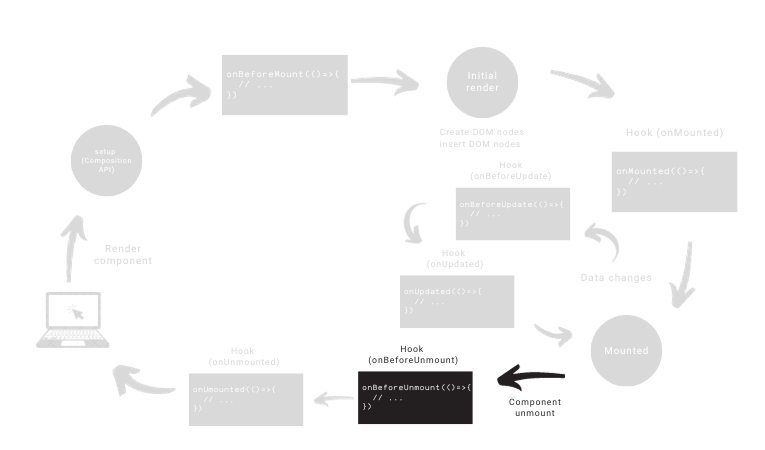
In Vue 3, a component is born when it is created and dies when it is destroyed. It goes through several phases in between, each with a specific purpose. Let’s take a look at these phases to understand how they work.
Component Creation
The process starts with the rendering (birth) of a Vue component.
When a component is instantiated, the function setup(), a fundamental part of the Composition API, is called. This function is where you define and organize the component’s properties, methods, and other reactive data.
<script>
 import { ref } from  'vue'

export  default {
  setup() {
   // "ref" is used to create a reactive variable
    const count = ref( 0 )

   // expose to template and other options API hooks
    return {
      count
    }
  },

  mounted() {
    console .log( this .count) // 0
  }
}
< /script>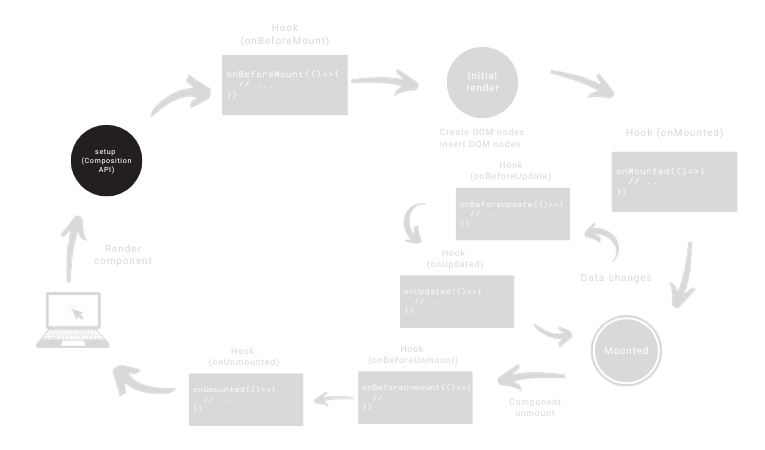
However, if you are using composition API with Single -File Components , <script setup>it is the best option for a leaner and easier to use syntax, and that is the syntax we will use in this post.
<script setup>
  import { ref, onMounted } from 'vue'


  const count = ref(0)

  onMounted(() => {
    console .log( this .count) // 0
  })
</script>
Lifecycle Hooks
The concept of hooks in the Vue lifecycle allows us to execute code at different stages of a component’s life. These methods are strategically placed to execute code at specific moments in a component’s journey.
For example, you can use a hook to initialize data when the component is created, or to update the component when it receives a new event. Hooks provide a structured and efficient way to manage the behavior of a component throughout its lifecycle. From now on, I’ll show you (almost) all of Vue’s hooks, in case you don’t already know them.
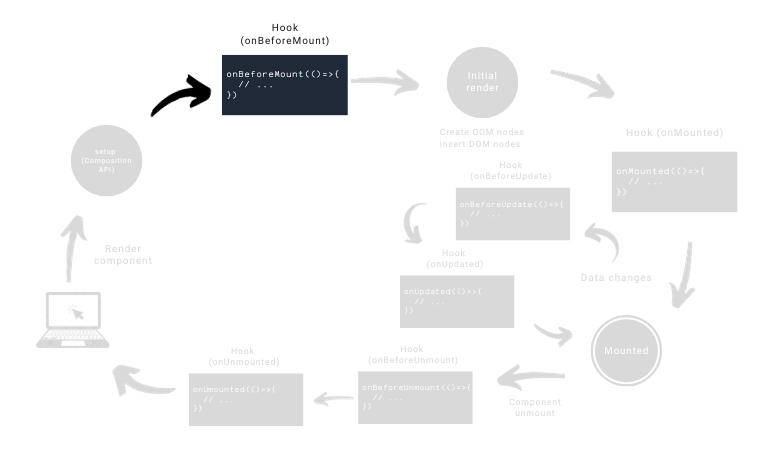
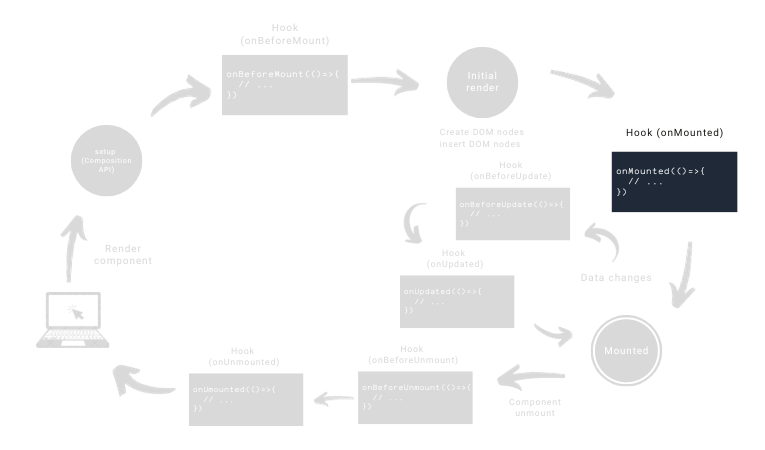
Vue 3 Hook:onBeforeMount()
The onBeforeMount()is our first Vue lifecycle hook, which is called before the component is even rendered for the first time.
At this point, the component has finished setting up its state and configurations ( setup()), but has not yet been attached to the DOM.
In other words, this onBeforeMount()is the time for you to do anything that needs to be done before the component appears on the screen, but after the component’s state and settings have already been configured.
onBeforeMount(() => {
 // Logic to be executed before the component is mounted
});
Vue Life Cycle 3: onBeforeMount
Common use cases for the onBeforeMount hook include:
- Initialization tasks that must be performed before the component becomes visible.
- Fetch initial data from an external source or API.
- Configure or subscribe to event listeners .
Tip: Anything you change in the component’s state onBeforeMount()will not appear on screen on the first render. If you need to do something after the component is mounted, use the next hook.
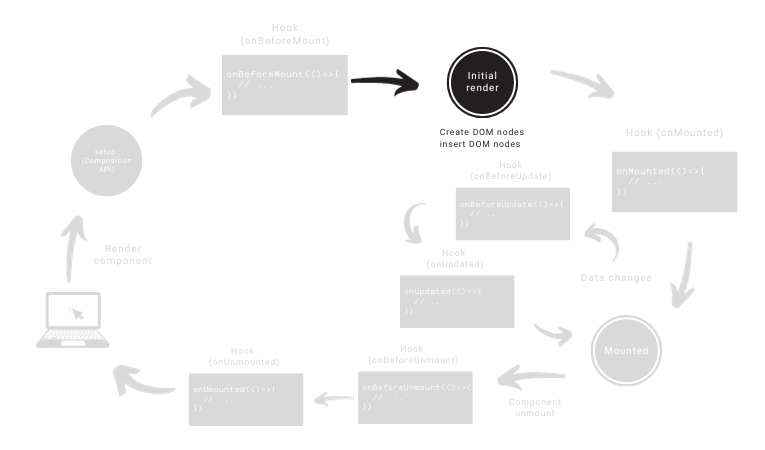
Initial Rendering
The initial render in Vue 3 is another step in the lifecycle. The syntax setupmakes it easier because it combines several steps into one. For those who are unfamiliar with some of the terms, here is an explanation of the key concepts involved:
The initial rendering process works like this:
- Compilation and Rendering Function:
- Vue compiles the template and automatically generates the render function based on the block
setup.
- Vue compiles the template and automatically generates the render function based on the block
- Reactive State Creation:
- Variables declared in the block
setup, like the onecountwe saw in the first example, become reactive. This means that changes to these variables trigger reactivity in the component.
- Variables declared in the block
- Creation of the Virtual DOM:
- The virtual DOM is automatically created based on the template and reactive state.
- Creating and Inserting Nodes into the DOM:
- Vue automatically creates the necessary DOM nodes based on the virtual DOM and inserts them into the real DOM.
- Automatic Assembly:
- With the syntax
setup, you don’t need a separate mounting hook. The code after the blocksetupis executed automatically after the component is mounted.
- With the syntax
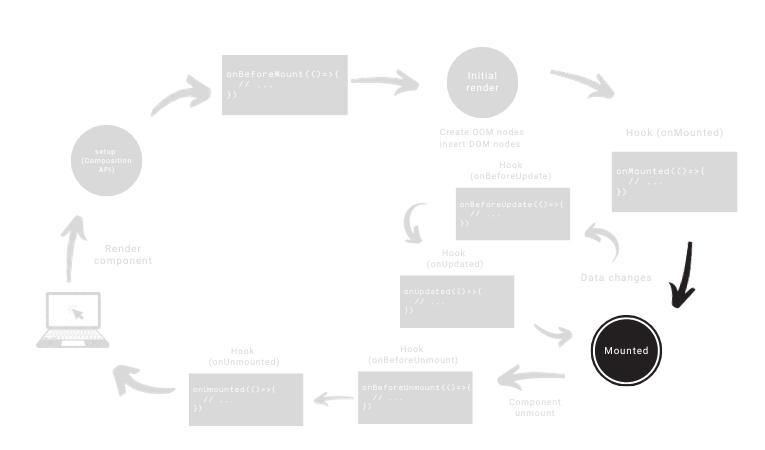
Vue 3 Hook: onMounted()
After the initial render, the hook onMounted()is called. This hook is part of the Composition API and is used to perform logic or tasks after a component has been mounted in the DOM.
onMounted(() => {
   // Logic to be executed when the component is mounted
});
The hook onMounted()is especially useful for tasks that require access to the DOM, as it ensures that the component has been fully rendered and inserted into the document.
Common use cases for the onMounted hook include:
- Initialize third-party libraries or plugins.
- Fetch initial data from an API.
- Apply CSS styles based on dynamic conditions.
The hook onMounted()is called after the component is mounted in the DOM. It can be used to perform logic or tasks that depend on the DOM being available, such as initializing a service, making an HTTP request, or attaching an event to the DOM.
After that, the component is finally assembled.
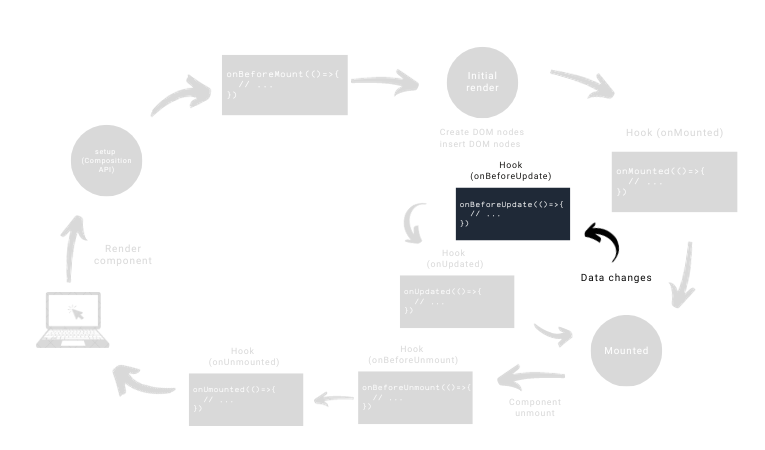
Vue 3 Hook: onBeforeUpdate
The hook onBeforeUpdate()is called before the component is updated. It is useful for doing things that need to be done before the update. For example, you can use the hook onBeforeUpdate()to clean up the DOM or to prepare the component for a new update.
onBeforeUpdate(() => {
   // Logic to be executed before updating the component
});
Common use cases for the onBeforeUpdate hook include:
- Perform cleanup or teardown tasks before re-rendering.
- Compare the current state with the future state for specific operations.
- Interact with external services or APIs to synchronize data.
Remember that if you change the reactive state in the hook onBeforeUpdate(), the component will not be re-rendered.
In Vue, a “reactive” variable is one that automatically updates the UI when its value changes. Vue uses a reactivity system to ensure that the UI always updates the data. When you declare a variable in a function setup()using the Composition API or in the body of a <script setup>, Vue makes it reactive. This means that Vue tracks changes to that variable and automatically updates the UI when necessary.
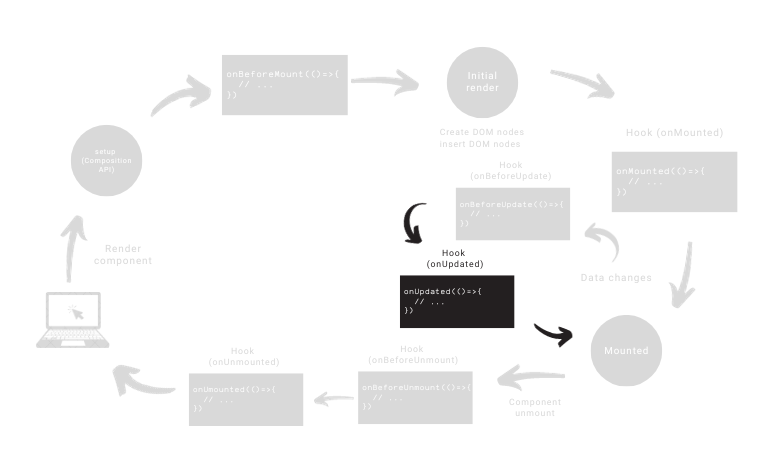
Vue 3 Hook: onUpdated
The hook onUpdated()is called right after a component and its child components are updated in the DOM. It is useful when you need to execute logic that depends on the updated state of the component, or when you want to do something after the component is re-rendered.
onUpdated(() => {
 // Logic to be executed when the component is updated
});
Common use cases for the onUpdated hook include:
- Fetch Updated Data: Imagine your component just got a redesign and now you need updated data to keep up. That’s where
onUpdated(). You can initiate an API call or get new information at the exact moment the component changes. - Dynamic UI Adjustments: Maybe your component needs to dynamically react to its own changes.
onUpdated()is perfect for adjusting the UI based on the latest state. - Handling External Events: If your component is connected to external events or services, now
onUpdated()is the time to synchronize everything. Whether it’s handling new messages, updates from other components, or anything else.
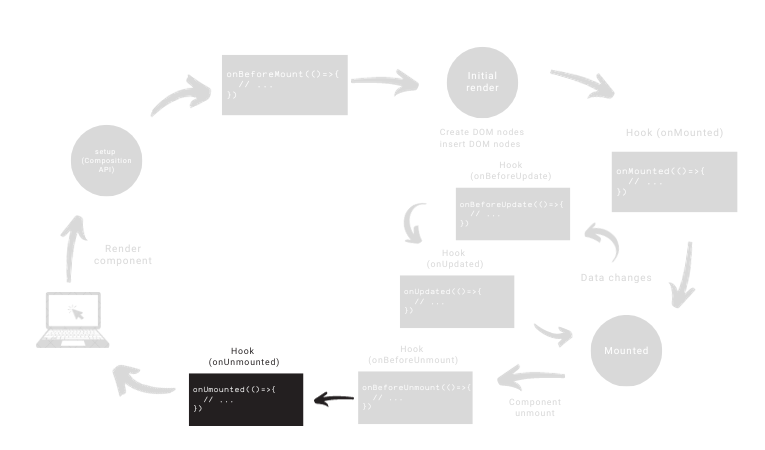
Vue 3 hook: onBeforeUnmount
In Vue 3, the hook onBeforeUnmount()is part of the Composition API and plays a crucial role just before a component is unmounted or destroyed. This hook provides a space for you to perform cleanup or finalization tasks just before Vue removes the component from the DOM.
onBeforeUnmount(() => {
 // Logic to be executed before unmounting the component
});
Common use cases for the onBeforeUnmount hook include:
- Clean up resources like timers or subscriptions.
- Unregister event listeners .
- Perform any necessary cleanup before the component is removed from the DOM.
The hook onBeforeUnmount()is called before the component is unmounted. It is useful for performing cleanup tasks, such as clearing the DOM, canceling HTTP requests, or removing event listeners. This helps keep your Vue application clean and efficient, avoiding memory leaks and other issues.
Vue 3 Hook: onUnmounted
The hook onUnmounted()is called when the component is unmounted from the DOM. It is also onBeforeUnmount()useful for freeing up resources that the component no longer needs, such as event listeners, HTTP requests, or DOM elements.
onUnmounted(() => {
 // Logic to be executed when the component is unmounted
});
Common use cases for the onUnmounted hook include:
- Disconnect from a WebSocket
- Unregister event listeners .
- Destroy objects or dependencies
A hook onUnmounted()is a way to make a component throw away resources it no longer needs before it leaves. This helps to free up resources efficiently and avoid problems like memory leaks. This practice is important to keep your Vue application running smoothly and avoid problems.
Closing:
That’s it, we’ve completed our journey through the Vue 3 lifecycle! Understanding how components come to life, change, and eventually say goodbye is key to unlocking Vue’s full potential. These hooks, like <h1> onBeforeUpdate()and <h2> onUnmounted(), are essential resources on this journey.
So, as you continue learning about Vue and its Composition API, keep these hooks in your toolbox. Happy coding, and may your journey with Vue be smooth and trouble-free!
Deixe um comentário